|
Click on any
picture for a
Close-Up view.
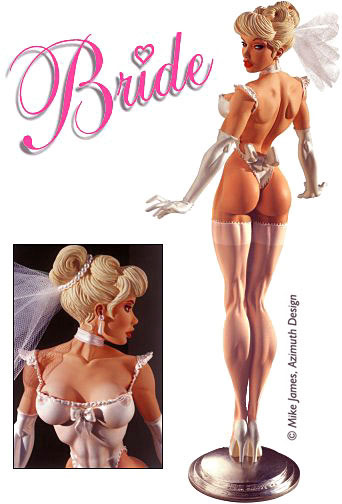
 1/5 scale - a full 15" tall assembled! (Closeup 57K)
Five solid-cast resin registered pieces.
Veil netting, earrings, and pearls included.
Detailed assembly & painting tips.
Free, animated Bride "FlipBook" (N/A).
Certificate signed by sculptor with raised seal.
A poster is included of a living Bride while supplies last. 1/5 scale - a full 15" tall assembled! (Closeup 57K)
Five solid-cast resin registered pieces.
Veil netting, earrings, and pearls included.
Detailed assembly & painting tips.
Free, animated Bride "FlipBook" (N/A).
Certificate signed by sculptor with raised seal.
A poster is included of a living Bride while supplies last.
|
 plus $30.00 shipping and handling
Make check or money order for $210.00 payable to Azimuth Design

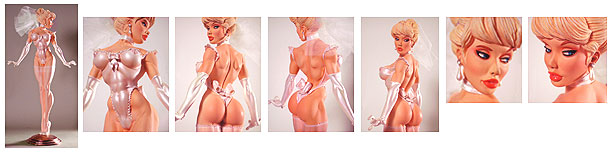
Click on Thumbnail pics below for detail views
Flip Book (No
longer available)
Congradulations to all of you that have received
the 110 page Bride paper "Flip Book"! This should
be considered an "ash can " edition. It was hand drawn
and hand produced by Mike James and took many generous hours
to bring to you. If that is not enough, there are a very very
low number of them that were printed. The flip book is also presented
to you as the animation below. To use it, you must have his expressed
permission (you must speak to him personally),
and there should be a copyright line with his name and a link
to the www.jamesart.com page. Please
inform us if you have seen this art without his copyright line
and link to our web pages.
Copyright © 1995 Mike James, Azimuth Design.
The Bride character, in whole or in part, likenesses thereof, storyline, costume and all related materials are copyrighted and
registered intellectual property of Azimuth Design. All rights reserved, in any media, including this animation.If you find
this animation anywhere that does not have our copyright and a link to our page, in full view, please contact us.
|
Kit Instructions
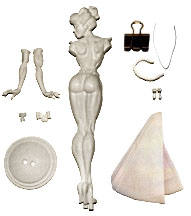
 Parts Check
Make sure you have all these parts.
Main resin parts:
1. The large, body/head casting
2. Right arm
3. Left arm
4. The circular base
In plastic envelope:
5. One large bow (resin)
6. One tiny bow (resin)
7. One pearl strand (for hair)
8. 2 teardrop pearls (for earings)
9. White veil netting
 Dressing the Sprues and Removing Webbing
You will notice there are cylindrical casting sprues on the soles
of her shoes. Do NOT cut these off! At least not entirely, they
are meant to serve as "pegs" that fit snuggly into the
base and offer necessary support. Clean them of webbing however,
and lightly sand, occasionally test fitting them into the base
for proper depth.
Remove all webbing between the legs. The area just above the
ankles is fairly obvious, but you may also wish to drill out the
tiny webbing under her crotch and shape the tiny space between
her upper thighs to a small inverted triangle.
The fingers require a delicate touch. We suggest an X-acto
knife outfitted with a #11 blade and sanding. Also requiring a
delicate touch are the bows. Remove sprues carefully with an X-acto
saw or coping saw, and "shave" down the webbing between
the ribbons with a blade.
 Attaching Arms to Torso
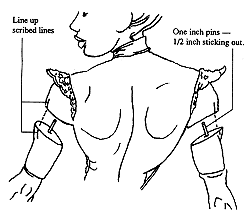 Test fit the two arms to the torso and clarify
which goes where. Notice the little vertical scribed line on each
deltoid. It should line up with the scribed line on the arms.
you may wish to pin the arms for added strength. Nails with the
heads clipped off, or an inch of strong coathanger wire is good
for this.
Test fit the two arms to the torso and clarify
which goes where. Notice the little vertical scribed line on each
deltoid. It should line up with the scribed line on the arms.
you may wish to pin the arms for added strength. Nails with the
heads clipped off, or an inch of strong coathanger wire is good
for this.
There are many pinning methods. If you have five-minute epoxy
around, the following is an easy method. Drill a l/2 deep hole
in the center of the arm that is a tight fit for the nail or wire.
Leave about a half inch sticking out. Into the center of the shoulder
flat, drill a very LOOSE-fitting receiving hole for the wire.
Drill just a little MORE than a half inch deep. Putting a piece
of tape on your drill bit will help you gauge this depth. This
loose hole gives you wiggle room to position the arm exactly right.
Test fit, then spread epoxy on the pin and squirt epoxy into the
big shoulder hole. First, insert the pin into the arm, then join
the two pieces and work it a bit. Hold in place until epoxy sets.
Putty seam and sand to 220 grit or finer finish.
 Attaching the big bow
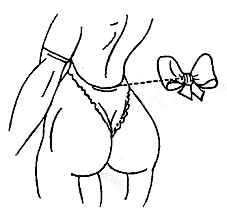 Finish cleaning and sanding the big bow before
attaching - it's much easier to get at, this way. You will notice
a small curved indention on the back side of the bow. This indention
receives the raised seam of her teddy just above the buttocks.
Test fit to feel the groove connect, and then glue on, making
sure the bow tilts just slightly to reflect the slight cock in
her hip and spire.
Finish cleaning and sanding the big bow before
attaching - it's much easier to get at, this way. You will notice
a small curved indention on the back side of the bow. This indention
receives the raised seam of her teddy just above the buttocks.
Test fit to feel the groove connect, and then glue on, making
sure the bow tilts just slightly to reflect the slight cock in
her hip and spire.
 Attaching the
tiny bow
Attaching the
tiny bow
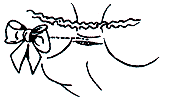 The tiny bow on the front of her teddy also
fits over a similar raised area the stretch of material between
her breasts about a quarter inch below the ruffle. Test fit and
glue generously.
The tiny bow on the front of her teddy also
fits over a similar raised area the stretch of material between
her breasts about a quarter inch below the ruffle. Test fit and
glue generously.
 Painting /
Flesh
Painting /
Flesh
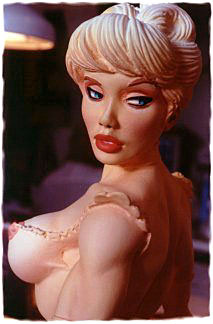
This is probably all the building you should do for now. It is
a good time to do some painting. As the majority of this model
is epidermis, it is important to spend as much time as necessary
to get her skin tones just right. We recommend painting flesh
ONLY in natural daylight. If it's night, wait until morning. If
you work days, wait until the weekend. If you don't do this, you
will soon see why you should have, when you view your efforts
in sunlight. Also, we should note that we used water-based acrylic
colors formulated for airbrush use.
To achieve the coloration in the reference photo, as many as
five different skin tones were mixed and airbrushed on, going
lighter, darker, redder, yellower, feeling the color out, darker
in the shadows, lighter on convex surfaces. Finally we "misted"
the entire figure a lighter tangerine shade. Eventually the surface
looked milky smooth and peachy like a baby's skin. Just the velvety
look we wanted. Also, we should note that we painted the torso
flesh as well, as if she were completely nude. This is because
we wanted to do a see-thru effect for her teddy later.
In general, the basic method we employ rendering flesh tones,
whether black, caucasion, or Asian is the same. First, solidly
paint the figure the color you want to end up with. Then lay in
darker values in depressions and shadowed areas. Next, highlight
the protruding convex surfaces with lighter flesh. Finally, "mist"
entire figure with subtle layers. This both "softens"
your modulations and color corrects. After this process on the
bride, we finished by airbrushing a creamy white over her breasts,
misting her buttocks with an orangy blush, and applying a pinkish
blush on the apples of her cheeks. Once all skin tones are exactly
the way you want it, protect with two light coats of Testors Dull
Coat Spray Lacquer and let dry overnite or at least a few hours.
 Painting / The face
We start first with the eyes. Notice that little holes have been
drilled to indicate the pupils. Mix up a straight black and fill
these in. While you've got black on your brush, draw in eyeliner.
Do not draw individual lashes, doing that always looks fakey,
and doll-like. For the upper lashes, just make one solid line,
thin near the inside corner, gradually going heavier to really
thick on the outside edge. On lower lashes, taper in the same
way, but with a much thinner line overall.
Iris color can be anything you wish. We did our "Bride"
as a classic blue-eyed, blonde. Whatever you decide, paint the
iris a slightly lighter shade of the color you want, and then
carefully outline the outside edge of the iris with a darker shade
of the color. This makes them look glassy and transparent. Also,
a nice trick to keep the eyes from looking flat, is to throw the
top third in shadow. Light gray for the top third of the whites,
and a dark version of your iris color over the top third of the
iris. This way, it looks as if her eyelashes are casting a shadow.
We painted liquid rubber masking frisket over the eyes, the
lashes, and upper lids in order to airbrush a reddish brown eyeshadow.
Mostly, we aimed right at the "crease" of the upper
lid and avoided the upper part just below the eyebrow. We brush-painted
an elegant shape for the eyebrows in a light orangy brown.
We darkened the nostrils with dark tan, and brush-painted the
lips. For lipstick color, we mixed mostly pink, added a drip of
orange, and two drips of "florescent" pink. This gave
us a really fresh, bright color. We watered down this lip color
for the airbrush and very lightly misted her cheeks and eyeshadow
area to pull everything together.
Lastly, a little darker flesh in the crevices of the ears and
we sealed the face with two light coats of Testor's Dull Coat.
 Painting / Hair
Again, give your "Bride" whatever hair color you wish,
but if you see her as a blonde, here's how we did it. First, with
paint-on liquid rubber friskit in two thick coats, we masked off
the face and all other skin within three inches of the hair. Then
we mixed up a whiteish, yellow-tan and solidly airbrushed her
hair, we did darker yellow-tan washes for the crevices, and drybrushed
pure white for highlights, Then misted all with the original yellow-tan
color to remove the contrastiness. Finally, we misted all the
hair in white to make her a "platinum" blonde. Sealed
with Dull Coat and peeled off rubber frisket.
 Painting / Outfit
To paint her outfit, we first protected the skin around her teddy
with the rubber frisket. We then merely "misted" the
teddy with pure white, lightening the skin tones. On the breasts
we sprayed more opaquely. Then we lightly misted the whole suit
again with "Pearlescent" or "Irridescent"
White, careful not to obliterate the skin tones underneath. We
sprayed the gloves, shoes and bows solid white before spraying
them solidly again with pearlescent white. The pearlescent paint
is not very opaque and requires a light base, that's why white
first). Also, do NOT Dull Coat the pearlized paint. Lastly,we
brush-painted in the nipples, mixing pearl white with the nipple
color to indicate visability through the filmy teddy material.
Onward to the stockings. Using drafting tape with very low
tack, we masked off a 3/4 inch band of stocking around the top
of each thigh and misted white. Peeling off only the lower piece
of tape, we then continued to mist the remainder of her legs,
only half-covering the flesh color. This gives a very effective
"sheer" look. Sealed legs with Dull Coat
Finally, we put Liquitex Gloss medium over the shoes to make
them glassy shiney. And while the gloss was on the brush, we also
coated the eyes and wet her lips.
 Surfacing the base
There are many treatments that can be done to the base - spray-painted
metalic or chrome bumper retouch lacquer is nice. Also, the water-based,
"pearlescent" or "irridescent" paint with
just a hint of pink looks great.
For the kit reference photos, a silver-leaf finish was applied.
At most crafts stores, you can buy Gold Leaf (expensive at about
$25 for 25 individual 3inch by 3inch sheets), Silver Leaf ($10),
or cheaper yet, Aluminum Leaf (just a few bucks.) We chose a warm
Silver leaf for that touch of "class". It's easy to
apply if you use some finesse. First, paint the sizing varnish
all over the top of the base. It looks like shellac and can be
airbrushed or hand brushed on thinly. Give it between a half hour
and hour to dry - touch it very lightly with your finger to test
tack. When it is about as tacky as drafting tape, you are ready
to leaf.
Turn off anything in the room that moves air. This stuff is
extremely thin and subject to the slightest air currents. Professionals
use a special brush to lift off the leaf, but just picking it
up carefully by two corners with your fingertips is fine. It's
like flipping a blanket onto a bed, but in slow motion. Just wave
the leaf over where you want it and let it drift down onto the
sticky surface. Do this with several sheets until it is covered.
You will need about five or six sheets. Now, with a VERY soft
brush, just tap it down gently and work it in.
 Attaching the base
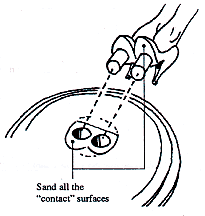 Sand off any paint that might have gotten
on the casting sprues coming out of the Bride's feet. Also, sand
the soles of her feet and inside the scribed area on the base
indicating where the feet will sit. You want a STRONG resin to
resin bond at these critical contact points. If you have not trimmed
off the sprue pegs to the proper length yet, do so now. Test fit
to make sure you can push the pegs all the way in, so that the
soles of her feet touch the base firmly and flatly. The heels
should also touch. Eyeball to make sure she is straight up and
down. Got it? Good, because you only have one chance at this.
Sand off any paint that might have gotten
on the casting sprues coming out of the Bride's feet. Also, sand
the soles of her feet and inside the scribed area on the base
indicating where the feet will sit. You want a STRONG resin to
resin bond at these critical contact points. If you have not trimmed
off the sprue pegs to the proper length yet, do so now. Test fit
to make sure you can push the pegs all the way in, so that the
soles of her feet touch the base firmly and flatly. The heels
should also touch. Eyeball to make sure she is straight up and
down. Got it? Good, because you only have one chance at this.
Pull her off and flood the pegs and soles of her feet with
cyanoacrylate glue (super glue). Take a deep breath and shove
her feet pegs down into the holes, working it back and forth,
pushing down hard. Once fully in, eyeball her quickly to make
sure she is straight up and down, turning to check plumbness from
all sides. Hold in position until glue sets.
 Attaching the veil and pearls
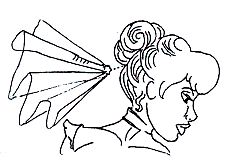 Lay a plate over the mesh provided and trim
to a circular shape. Twist it in the center to make a sort of
conical fan design and tie the pointy end with white thread to
hold that shape. Put a healthy drop of glue on the end and attach
to the underside of the hair bun. Grab the string of pearls and
put a drop of glue on one of the end pearls, attaching next to
the veil. Wrap around bun and find which pearl will touch the
veil on the other side. Put a drop of glue on that pearl to weld
it to the string. Let it dry and trim off any excess pearls. (Save
them for the earrings if you want.) Now, glue the entire strand
in place.
Lay a plate over the mesh provided and trim
to a circular shape. Twist it in the center to make a sort of
conical fan design and tie the pointy end with white thread to
hold that shape. Put a healthy drop of glue on the end and attach
to the underside of the hair bun. Grab the string of pearls and
put a drop of glue on one of the end pearls, attaching next to
the veil. Wrap around bun and find which pearl will touch the
veil on the other side. Put a drop of glue on that pearl to weld
it to the string. Let it dry and trim off any excess pearls. (Save
them for the earrings if you want.) Now, glue the entire strand
in place.
 Jewelry
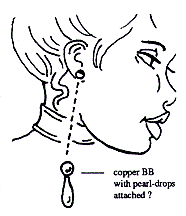 We have seen people use sequins, polished
BB's, pieces of mirrored mylar, almost anything shiney for earrings.
You can rummage through almost any utility drawer and find stuff
that could make earrings - feel free to be inventive here. We
have included two little pearl-drop earrings as an option. They
work by themselves or as an addition to any round bead. With that
final detail complete, you are probably now admiring one of the
most "beautiful" figurative kits you are likely to see
in this hobby. So, enjoy your new "Bride" and till death,
do you part.
We have seen people use sequins, polished
BB's, pieces of mirrored mylar, almost anything shiney for earrings.
You can rummage through almost any utility drawer and find stuff
that could make earrings - feel free to be inventive here. We
have included two little pearl-drop earrings as an option. They
work by themselves or as an addition to any round bead. With that
final detail complete, you are probably now admiring one of the
most "beautiful" figurative kits you are likely to see
in this hobby. So, enjoy your new "Bride" and till death,
do you part.
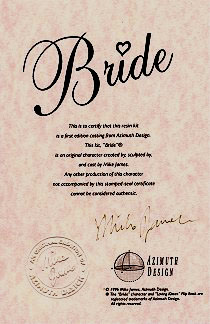
We have had a lot of illegal knock-offs of our
kits sold in foreign countries.
Remember, Azimuth Design only sells directly to
the customer, not in stores. If your kit does not include
the Certificate of Authenticity below, with the
Raised Seal and personally-inked signature
of Mike James,
you do not own a Mike James original piece of art.
It takes a lot of time, skill and money to bring you these precious
girls. Please support creators, not thieves.
Contact us if you suspect illegal activity, or if you see a Mike
James kit or image being used for profit.
Copyright © 1996 Mike James, Azimuth Design
The Bride character, likenesses thereof, storyline, costume and all related materials are copyrighted
and registered intellectual property of Azimuth Design. All rights reserved, in any media.