 Cricket is a big
girl with a lot of major parts. Check this picture and list to
make sure you have everything.
Cricket is a big
girl with a lot of major parts. Check this picture and list to
make sure you have everything.(Approved by Cricket herself!)
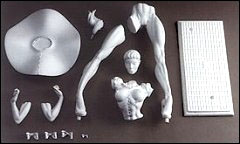
![]() Parts Check
Parts Check
Cricket is a big
girl with a lot of major parts. Check this picture and list to
make sure you have everything.
![]() Prepping the Parts
Prepping the Parts
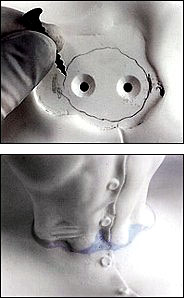
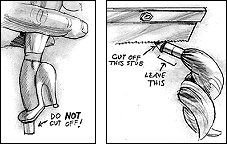 Before grinding
off casting stubs and finning, please note: DO NOT CUT OFF THE
PEGS COMING OUT OF THE BOTTOM OF CRICKET'S SHOES. These are her
support pegs, crucial to the structural integrity of the piece.
Also, DO NOT cut off the 3/4 inch peg coming straight off of her
ponytail. This peg fits into the hole in her head. See picture
on where to cut.
Before grinding
off casting stubs and finning, please note: DO NOT CUT OFF THE
PEGS COMING OUT OF THE BOTTOM OF CRICKET'S SHOES. These are her
support pegs, crucial to the structural integrity of the piece.
Also, DO NOT cut off the 3/4 inch peg coming straight off of her
ponytail. This peg fits into the hole in her head. See picture
on where to cut.
Now, begin grinding off the casting sprues. After this is done, putty any seams or pinholes. On some kits you may notice some light blue spots. This is where we puttied some of the more visible defects to save you some time.
Separate the individual ribbons from each other and grind off
excess resin, re-shapping as you go. We highly suggest returning
the separated ribbons to the little plastic bag they came in so
they don't get lost.
![]() Initial Assembly
Initial Assembly
 Well, if you've
done the above, you've had your hands all over little Cricket
by now, and though it's been fun, she still looks basically like
she did right out of the box-grrrrr. Now, that will change. We
will assemble some parts, but NOT the whole thing, because this
will make painting much easier.
Well, if you've
done the above, you've had your hands all over little Cricket
by now, and though it's been fun, she still looks basically like
she did right out of the box-grrrrr. Now, that will change. We
will assemble some parts, but NOT the whole thing, because this
will make painting much easier.
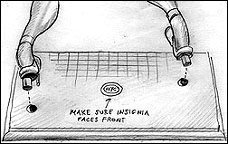
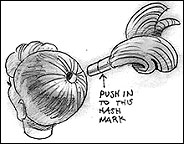
Legs: First we want you to test-fit-that is,
DO NOT GLUE. The base has a front, and it's easy to forget this.
Turn the base so the little insignia in the center can be read
properly. The front of the base is now facing you. Push the feet
pegs into the holes so the toes face you too. They should slide
in easily. If not, sand a little off of the pegs. Now, match up
the diagonal cuts on the right leg. There is a little hash mark
on the outside thigh to help you line up. Got the feel of how
it fits? Good.
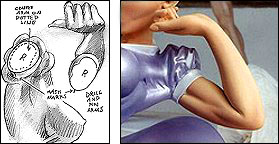
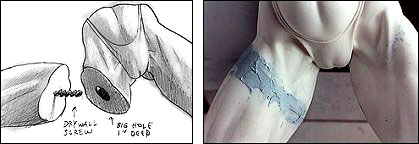 Now, we'll drill
and pin the two parts together. Drill a hole into the center of
the flat of the smaller leg, insert and glue in a nail or screw.
Clip off the head to leave about an inch of it sticking out. Now
drill a an oversized hole in the other leg part to receive the
nail (or screw) that is sticking up.
Now, we'll drill
and pin the two parts together. Drill a hole into the center of
the flat of the smaller leg, insert and glue in a nail or screw.
Clip off the head to leave about an inch of it sticking out. Now
drill a an oversized hole in the other leg part to receive the
nail (or screw) that is sticking up.
This is important. Before gluing, test fit the two parts making sure the muscles, on ALL sides, line up nicely. If not, drill out the receiving hole bigger. If so, it's time to work fast. Fill the oversized hole with putty or epoxy, slop some glue on the flats, and quickly stick each foot peg into their appropriate holes and squeeze the diagonal-cut leg parts together.
This is your last chance to get a perfect match up. Adjust
while the feet are still in the holes. Once set, you can take
the feet out of their holes to finish puttying and sanding the
leg seam.
![]() Attaching Skirt to the Torso
Attaching Skirt to the Torso
 You've probably
already noticed that we tried to make it easy for you, with indented
wells, to figure out how the skirt fits the legs and torso parts.
We will wait until AFTER painting to attach the legs to the skirt,
but we can attach the torso to the skirt now.
You've probably
already noticed that we tried to make it easy for you, with indented
wells, to figure out how the skirt fits the legs and torso parts.
We will wait until AFTER painting to attach the legs to the skirt,
but we can attach the torso to the skirt now.
First hold the top of the skirt close to a bright light. The light will shine thru the resin. From the underneath side, you should be able to see a fuzzy edge that indicates the waist-well of the top side. On this underneath side, mark the rough contours of this waist well (see picture). Now for a test fit. Push the torso into the little well of the skirt. Got how it fits? Okay. Remove it, slop glue on both surfaces and press back together. Think that's it? Ah, ah ah, we're not done yet. This joint has to be SUPER strong.
Flip the skirt back over to the underneath side. Drill two holes about and inch and a quarter deep INSIDE the circle guide you drew that indicates the waist contours. Be careful-you REALLY don't want to miss hitting that tiny waist. Also, make sure not to drill too deep or you'll come out her tummy! (She's really leaning back and it can be misleading.) Countersink these holes to accept two, one-inch flathead screws (see picture). When inserted, the heads should be BELOW the surface of the resin. The screws don't actually have to "screw" in. In fact, they should just "fall" in. Poke some glue into the holes, all over the screws and squish them in. Quickly, wipe off the excess. We're talking "invincibly" strong.
Now, for a little contouring. Flip the assembly back over to
view the top. Time to grind and putty that seam. You want a smooth,
flowing, seamless curve. We've sculpted a bit of a curve to give
you a head start, but don't be afraid to grind out some skirt
resin to get a really smooth, flowing contour. The skirt is plenty
thick enough at this point to grind into to get your sweep. After
you think you have it contoured, puttied, and sanded pretty good,
wipe down the area with alcohol or lacquer thinner and give it
a light coat of sandable primer to help you locate defects. You
can continue puttying right over primer. If the ribbon belt is
going to be used, it will hide a lot of the imperfections, but
we warn you, she looks pretty sleek without a belt too, especially
if you are considering the black latex look, so we suggest doing
a really elegant job on this seam in case you change your mind
about adding the belt.
| We should mention here, DO NOT ATTACH THE ARMS NOW. Not until all painting is complete. Trust us on this one. |
![]() Attaching the Head
Attaching the Head
Another place where it's a good idea to pin. A small clipped-off
finishing nail works fine. You know how by now-we won't even bother
with a picture. Use the crease in the back of her neck to assure
proper alignment. Doubtless you noticed that a casting sprue comes
out of her hair-grrrr. Yeah, we know, but doing this assured us
that her face (a much more critical area) would come out perfect.
Actually, it's a pretty simple matter to regroove the hair. Just
connect the lines with a file or folded sandpaper.
![]() Attaching the ribbon to the ponytail
Attaching the ribbon to the ponytail
| DO NOT GLUE THE PONYTAIL TO THE HEAD! |
We are only going to glue the ribbon onto the ponytail post.
Gently fit the ponytail post into the head hole. If it doesn't
go in easily, sand the post slightly and try again. It should
go in up to the scribed line. To get the ponytail turned correctly,
find a little DOT on the post and face it FRONT. That dot matches
a similar dot on the back of one of the big ribbons. Now just
glue the ribbon onto the post, making sure not to let the glue
drip onto the head. Once set, take the ponytail back out and set
aside. That's it for now.
![]() Degreasing and Priming
Degreasing and Priming
Below are your new assembled parts for priming and painting. After
these parts are painted, we can do FINAL assemblage on the kit.
Next, give Cricket a bath. Before spraying primer on these parts you must throughly DEGREASE and dry them. There is mold release used in the casting process that you can't see or feel and it will prevent your primer from adhering. Also, if not primed, in a year or two the oils leeching from the resin will discolor your paint.
To remove the mold release, use lacquer thinner. It cuts just about anything. Rubbing alcohol will work, as will lemon juice and a toothbrush. After scrubbing the parts down with this, give them a lukewarm soapy bath. Don't use hot water, just body temperature. Sponge the parts down with dish detergent, rinse and towel dry. Blowing into crevices will chase out errant water. Also, a warm (NOT hot) setting on a hairdryer will facilitate drying the parts completely.
Now, for priming. We recommend a light grey sandable primer. Two light coats, just enough to cover is enough. Fussy modelers may want to knock back some of the primer's graininess by lightly sanding with a very fine 600 grit sandpaper. If you do this, re-bathe the parts in water to remove the sanded residue.
![]() Mixing and Painting Flesh
Mixing and Painting Flesh
It's always a good idea to paint flesh colors in daylight. It
becomes a MUST when your kit is 1/4 scale and exposing as much
flesh as Cricket. We suggest setting up a table at a big, bright
window.
There are many pre-mix "flesh" colors out there and they all stink. They are variations on tan, which is brown and white, and look like dirt unless doctored. We recommend making your own flesh. Lots of white, smaller and equal amouts of pink and that dirt color called flesh. To this, add some drops of straight orange, and a couple of yellow. This renders a knockout "peachy" color that brims with life, very fresh and ingenue. If it looks too harsh, add white and a drop of lime green. Never, ever, darken a light color with black.
We've seen fleshtones applied superbly with a brush. But oil paints were used, which can be blended well. Blending is the key, and if you are using water-based paints, there is really only one way to go, airbrush. If you regularly build kits and don't have an airbrush, get one. They are pretty cheap nowadays and really fun.
Now, take your custom flesh color and coat all flesh areas solidly. Remember there is more to this kit than legs, don't forget her face and arms. Several light coats are always better than two heavy coats. Next, make a slightly darker, orangy version of your color, and also a lighter version (double the white). Lightly mist the crevices with the darker version, and lightly mist the crowns of the muscles with the lighter version. If you go too far and there is too much contrast, no problem, just evenly mist the original flesh color back over all the flesh. Finally, we mist a darker orangy/rose tonation to the apples of her cheeks and buttocks to give them a flushed, "embarrassed" look. Hmm, is it possible for a "derriere" to be embarrassed pink? Anyway, see the reference photos.
Also, check your colors in sunlight outdoors. Once satisfied, spray with two light coats of Testor's Dull Cote to seal and protect.
![]() Painting the Face
Painting the Face
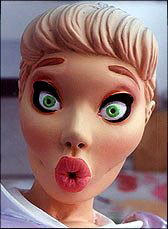 Eyes:
Airbrush a brick orange color around the outside her eyelashes,
wider on the outside corners, tighter on the inside corners. (See
reference pics.) Then go back and replace the original lighter
flesh color to the top edge of her sculpted eyelashes. This will
make it look like her eyelids are catching light from above. Brush
on straight black to the front surfaces only of the eyelashes.
With black still on your brush, fill in the drilled holes of her
pupils.
Eyes:
Airbrush a brick orange color around the outside her eyelashes,
wider on the outside corners, tighter on the inside corners. (See
reference pics.) Then go back and replace the original lighter
flesh color to the top edge of her sculpted eyelashes. This will
make it look like her eyelids are catching light from above. Brush
on straight black to the front surfaces only of the eyelashes.
With black still on your brush, fill in the drilled holes of her
pupils.
Then paint the whole surface of the actual eyeball white (except the black pupil). Decide on an eye color. Paint a "light" version of it for the iris, Then, outline the iris edges with a darker version of the same color. This will make her iris look glassy and transparent. Finally, paint the top 1/4th of the whites with a very light grey so it appears that her eyelashes have real dimention and are casting a shadow onto the eyeballs.
Lips: First swirl a darker red-brown flesh into the little hole her lips make. While your at it, dot the insides of her nostrils too. Then, mix up a small batch of bright hot pink-the brightest, candiest color you can make. For a real kicker we added a few drops of florescent pink. It provides Cricket with lips that practically scream to be kissed. Give her lips and fingernails a covering coat or two of this color. Pour out a few drops onto a plate and add a drop of red to darken. Brush in teeny little lines to show the depressed wrinkles in her puckered lips. Lighten that original pink-candy color and draw more lines to indicate a few highlights. If needed, soften with a thin coat of the original color all over.
Once satisfied, seal entire face with Dull Cote.
![]() Painting the Hair
Painting the Hair
For blonde hair, like in the reference photographs, mix yellow,
your custom flesh color, and lots of white. Most people paint
blonde hair too yellow. Try to stay towards a cream coloration.
First, paint hair solidly, and don't forget to do the ponytail
at the same time. Once that's dry, make a wash (watered-down paint)
from your dark flesh color and flood it over the hair, so that
it gathers in the crevices. Let the wash drain by holding it upside
down, twisting this way and that, trying not to get the runny
paint on her face. But even if it does, the Dull Cote protects
her face, and you can wipe it off while wet. Now, mask off her
face (make sure it is an extremely low-tack drafting tape) and
give the hair a final misting of very light cream. This gives
her a beautiful platinum blonde look. Once satisfied with hair
... you guessed it, seal with Dull Cote.
![]() Painting Dress / Shoes / Big Bows
Painting Dress / Shoes / Big Bows
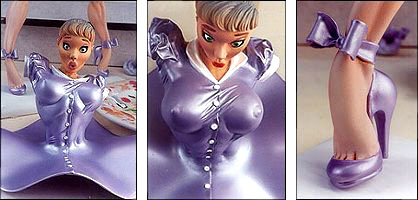
There are lots of wonderful options here. In fact, even WE had
a tough time deciding how to show her-every idea just looked great!
We loved her in pink, as a "babydoll", and we loved
her completely sheathed in rubber as a "vixen". We loved
her as a redhead and we loved her in gingham. We cherish her little
school-girl collar but ground it off in one version to let her
cleavage explode-mercy! Four of our favorite coloring schemes
are represented on the poster enclosed. With small alterations,
Cricket can be as innocent as a newborn fawn, or as wicked as
you want her to be. The only thing we advise is not to get too
tricky with outfit colors. Keep them simple, one color, two colors
at most.
To achieve the metallic lavender color of the reference pics, here's what we did. Mix about 10 drops of purple and 5 drops of blue to an ounce of white. This makes the "base" lavender. Masking off all that was NOT to be lavender, we sprayed light coats until the dress, shoes and all 3 big bows were covered thoroughly. (Don't forget the ponytail bow). Then we mixed a second batch of lavender-but, we substituted "Irridescent White" for plain white.
Irridescent White is also known as Pearl White. It has a wonderful metallic pearl coloration. For those smartypants out there thinking they'll avoid a step by just spraying the "irridescent" lavender over bare primer, you're in for a shock. No matter how many coats you put on, it will never cover. Irridescent white is practically transparent. Also, BIG NOTE: Do NOT seal irridescent colors with Dull Cote! It will loose it's pearly effect.
After the dress, shoes, and bows were thoroughly dry, we removed the masking and did the usual touching up. For the collar, sleeves, and buttons, we masked off and sprayed pure white, then pure irridescent white on top of that. Just a mist is all that is really needed. We also made irridescent that precious little panty bow, as well as the panties themselves. This really pulled her whole outfit together. Again, NO Dull Cote on irridescent white.
![]() Stockings
Stockings
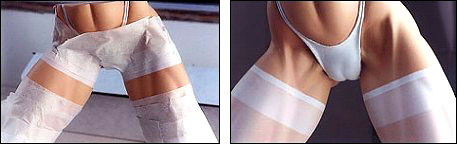
This is one of the most frequently asked questions we get. "How
did you do the stockings?" Well, it's so simple you're gonna'
kick yourself when we tell you-because, with an airbrush, nothing
could be easier. The legs are already flesh, so you've done the
hard part. Just tape off an exposed band at the top of her thighs
about 5/8 inch wide (see picture). Tip: Mask the tummy and buttocks
completely. Now, load up your airbrush with thinned-out white,
back away about a foot, and lightly mist (and we mean LIGHTLY)
this area. You might want to peel back a discrete piece of the
tape to periodically check the coverage. Stop applying the white
BEFORE you think it looks right-you'll see why in a second. Now,
remove the masking from the lower section only, exposing all of
her legs that are to be covered by stockings. Mask off the shoes.
Now, back off again with the airbrush and lightly mist everything.
As is now apparent, that wide top band is getting a "double"
hit of mist. That's why you stopped early on the first spraying.
(By the way, the exact same process can be used for dark stockings.
Don't use straight black though-cut it with about 50 percent brown
or you'll loose the underlying flesh color. Also, go much, much
lighter when misting black.) For a little extra detail we did
a third spraying for that thin, uppermost band. And, finally,
though it's not really needed, we found a length of lace ribbon
and carefully cut off the loopy outer edge. We spot glued these
loops around the very top to give her stockings that "extra-fancy"
look.
![]() Final Detailing on Cricket
Final Detailing on Cricket
With a small brush, and a plate with drips of all the colors used
on this kit, we went around touching up whatever defects we saw.
Inevitible pecks, torn paint edges, areas missed, that sort of
thing. A good idea at this point is to take dark flesh and hit
a few areas like the inside crevices of her ears, the crevices
between her fingers. You'll see Cricket clean up in a hurry.
Here's a kicker that adds a lot. Get a high-gloss varnish like Liquitex Gloss Medium. Slop a coat on her lips, eyeballs (avoid the lashes) and fingernails. Be patient-let it dry naturally, then slop on another coat. The trick to acrylic varnishes is not to fuss with them trying to get it "even". Just flood it on and back off. Pushing it around with your brush, even when drippy wet, will only leave nasty streaks once dry. It pretty much evens itself out anyway by suctioning the excess into the thinner areas as it dries.
![]() Painting the Base
Painting the Base
Paint the entire base black. Try to avoid getting too much paint
on the little lettered insignia in the center. Next dip an old
makeup sponge, or even just your finger into silver paint and
lightly dab the top of the grill. Don't attempt to do the sides
of each of those little squares, that would not only be maddening,
it doesn't even look that good-just the tops will give you the
look you want. Now, with a little more care, dab the little insignia
in the center leaving the incised lettering black. If you accidentilly
get silver in there, just get a fine-hair brush and retouch the
black. With silver, paint the four most outside edges of the metal
grill down to where they meet the concrete texture.
Paint the concrete a matte light grey and let dry. Now get some paper towels ready. Mix up a dark grey-brown wash (not too watery). Flood it generously over one of the four sides and immediately wipe off the excess. The dark muddy grey should remain in the crevices, but cleaned off the top surfaces. Repeat the wash-then-immediate-wipe on all four sides, one at a time.
Finally, take more of the dark grey-brown on a brush and darken the seam where the concrete and metal meet. You may want to mask off the silver grill and spray Dull Cote onto the concrete, but we didn't bother, hey, who's gonna notice if that area gets dinged-up? It's supposed to be.
Legs. Now for some real fun-let's complete Cricket. Legs first. Clip the head off a two-inch long screw. Drill a one-inch deep hole into the center of the top flat of her legs. Glue up half the screw and stick it in the hole. Now, test fit, trying to line up the legs and skirt. Note where the protruding screw hits the underside of the skirt and mark that. Drill a wide hole there and test fit, this time putting the screw into the hole. The contours of the leg flats must fit precisely into the indention provided in the skirt. If not, widen the skirt's screwhole in the direction required for a proper fit You may have to do this a couple of times. Once worked out, carefully scrape paint off both the big flat contact surfaces. This will insure a mega-strong resin-to-resin bond. Slop epoxy into the skirt's big screwhole, onto the screw itself, and onto the resin flats. Before pressing together turn the piece upside down so epoxy doesn't run down her legs. Now press together tightly and hold until set.
Ponytail. We know you've been dying to do this. Recheck alignment, then glue in the ponytail making sure the ribbon faces front.
Shoe Bows. Here's one you probably weren't expecting. The two shoe bows are marked Right and Left, and have an Up and Down. There is a little hash mark on the center of the bow backs that indicates up. And also, on the bow backs off to the side of the contact area, there is a tiny little "L" and "R" which determine which foot they go on (remember that's HER left and right, not yours.) Scrape paint off both contact surfaces and glue on.
Panty Bow. Now for that almost insultingly-innocent little panty bow. It has an "Up" position as well; "angled" on the back so it doesn't point to the ground. You'll figure it out. Scrape contact points and glue it, center right above the top seam of the panties.
 Arms.
Now the arms. The arms look similar, but each is clearly marked
right and left on the flats. To assist getting the proper rotation,
there are hash marks on the under- side of the arms that line
up with hash marks on the underside of the sleeves. You may wish
to pin the arms as well. That's a good idea, but keep in mind
that these are finished pieces-you have to be neat about it. Double-check
your hands for glue or dirt. If done neatly there should be no
puttying required. So...you know the drill, clip off two finishing
nails, blah, blah, blah...
Arms.
Now the arms. The arms look similar, but each is clearly marked
right and left on the flats. To assist getting the proper rotation,
there are hash marks on the under- side of the arms that line
up with hash marks on the underside of the sleeves. You may wish
to pin the arms as well. That's a good idea, but keep in mind
that these are finished pieces-you have to be neat about it. Double-check
your hands for glue or dirt. If done neatly there should be no
puttying required. So...you know the drill, clip off two finishing
nails, blah, blah, blah...
Now...Cricket is done. So ... we ask you, is she a stunner,
or what?
| FIRST MAKE SURE THE BASE IS TURNED SO THAT THE INSIGNIA IS RIGHT-READING. |
That is, "NYC" should be readable from her front. Scrape all paint off the pegs, the soles of her shoes, and where they touch the base. Slop some glue into the holes, on her feet pegs, and on her soles and push them into the holes. Wiggle her back and forth for a second to work the glue around. Then hold her in the front-most, leaning-forward position and freeze.
| IT IS IMPORTANT TO TILT HER AS FAR FORWARD AS POSSIBLE BEFORE THE GLUE SETS. |
Once set, guess what? ... You're done!
Time to scoot back, marvel at your genius, and simply bask in the glow in little Cricket's wonderful, life-affirming presence. She loves you for the good job you did. Congratulations.
Copyright © 1997 Mike James, Azimuth Design.
The Cricket character, in whole or in part, likenesses thereof, storyline and all related materials are copyrighted
and registered intellectual property of Azimuth Design. All rights reserved, in any media.
Copyright © 1994-1997 Firefly Design.