|
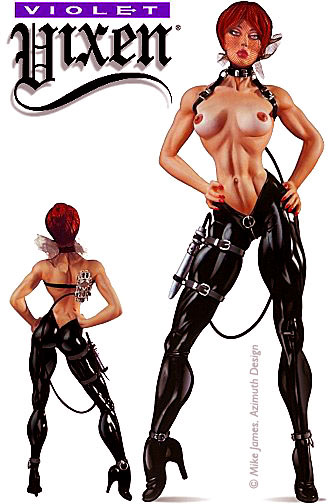
Click above
picture for a
Close-Up view.


1/6 scale - 11 1/2" tall.
One solid-cast resin piece plus accessories.
Includes metal rings, rubber hose, mesh, etc.
Assembly and paiinting instructions.
Free "Violet Vixen" comic book enclosed with kit (N/A)
Sculptor-signed certificate of authenticity. 1/6 scale - 11 1/2" tall.
One solid-cast resin piece plus accessories.
Includes metal rings, rubber hose, mesh, etc.
Assembly and paiinting instructions.
Free "Violet Vixen" comic book enclosed with kit (N/A)
Sculptor-signed certificate of authenticity.
|
 plus
$20.00 shipping and handling plus
$20.00 shipping and handling
Make check or money order for $140.00 payable to Azimuth Design

Copyright © 1995 Mike James, Azimuth Design.
The Violet Vixen character, in whole or in part, likenesses thereof, storyline, costume and all related materials are copyrighted
and registered intellectual property of Azimuth Design. All rights reserved, in any media.
Comic Book (No
longer available.)
Each kit includes a 25 page Violet Vixen
comic. Adult Material. Click on one of the sample pages below
to see a closeup. 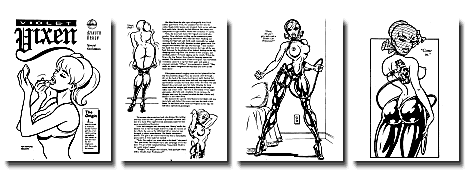
Congradulations to all of you who own this wonderful
Violet Vixen comic. This ash can edition was hand written,
hand drawn and hand printed by Mike James. There are very few
of them out there so hang on to them. To find out more click
on one of the sample pages above to see a closeup
|
Kit Instructions
1. De-finning. Since you are reading this, we'll assume
you got the box open. First lay out all your white resin pieces.
Let's see. There's, uh...one. One big piece of resin, in a shape
of a girl with a body that should be declared illegal. Find it?
Good.
Now if you can quit oogling her body, it is likely you will
notice casting fins and thin mold webbing holding things together.
These need to be trimmed off carefully with an X-acto knife. The
sketch below will help you identify all of them.
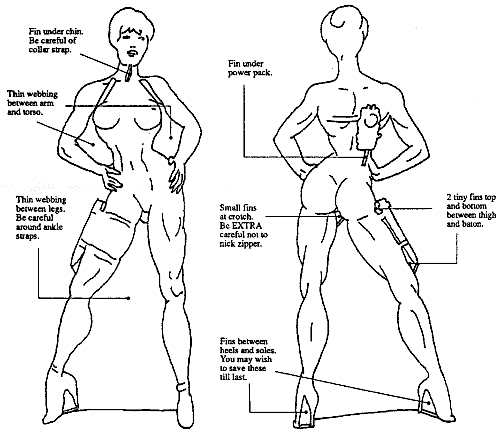
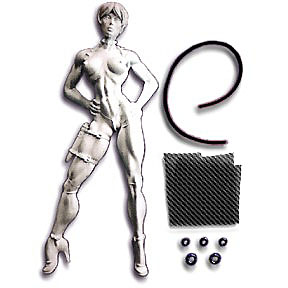
2. Small Parts Check. You should have a small plastic
bag filled with these parts in your kit. Black netting for covering
her head (she's very shy you know.) Five small metal rings, one
is an oversized easy-access "pull tab" for zipper. Two
dangle from her ankle straps (we can only dream what these are
for) and two more for either side of her choker belt. Also a small
length of black rubber hose (operates as power feed from the back
pack to her baton.)
3. Cleaning. Now that you've cleared your little vixen
of those pesky webs and located her little bag of accessories
you can begin assembly. Okay, so there's no assembly. Find something
else to do. Maybe look for tiny air bubbles that need filling.
Or lightly sand her with some extra-fine 400 grit sandpaper. If
you don't see anything else, either rub her down with alcohol,
or give her a warm soapy bubble bath. This will remove any mold
release that will prevent paint from sticking. As you're cleaning,
be sure to reach into all her little crevices. (She likes Q-tips,
they tickle.)
4. Replacing heels. This lady can stand on her own two
feet just as she is, but sometimes, when she meets up with a ham-handed
brute, one of her heels may break off. That makes her really mad.
If you are a ham-handed brute and don't wish to see her really
mad, you can fix her up good by replacing her resin heels with
steel nails. It's easy.
Snap off about half of the existing heel. Using a 3/32"
bit, carefully drill 3/8 inch deep into the bottom of each heel,
making certain to get the same angle as the broken-off heel. Now,
clip off the pointy ends of two 4D finishing nails so they
are only 1 inch long. Note that you still have the nail heads;
don't cut them off. Push the nails into the drilled holes unglued
and stand her up on a smooth (formica) level surface. Letting
the nails slide freely, adjust her to the point where she will
be balanced, and use a rapidograph or other sharp marking device
to mark the point where the nail disappears into the resin. Now,
you can take out the nails, apply super glue and push them back
in, only as far as your marked points. Notice that the tiny nail
heads replicate perfect heel soles. Now just putty and retaper
bulk of heel to flow naturally. Ta Da! Invincible stiletto heels!
And, ooh boy, is she gonna' thank you later.
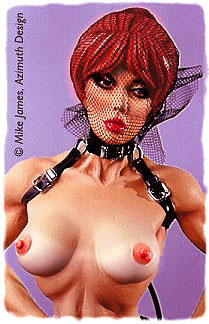
5. Painting. First, prime all with White primer. If
you want the look of the reference pic, (super-shiney pants) these
will need to be painted first. Go to an automotive supply store
and get a small can of Gloss Black retouching Lacquer. It's the
shiniest paint you can get! You'll love it. Tape-mask all belts,
skin, hair. Spray her with a first coat, the INSTANT it
looks wet, STOP! You do NOT want runs! Allow to
dry for one hour at room temp only (don't use heat!). Apply the
second coat, as soon as you get that glossy look again, STOP!
Even though this paint will feel dry to the touch in minutes,
do NOT handle for several hours. Also, do not clear coat
this paint. It's tough enough for automobiles, it'll take any
abuse YOU can dish out on her for years to come.
Now mask off pants with liquid frisket (Maskoid). Paint violet's
flesh a pale orangey-tan with a darker rosey blush on the apples
of her cheeks. We suggest airbrushing creamy white over her, uh...
chestal globes. We also recommend spraying just slightly darker
flesh tones into the crevices of her muscles. After her skin tones
are perfect and smooth, seal lightly with flat lacquer (dull coat).
With a tiny brush do her face. Go slow. Seal with flat lacquer.
Paint her hair opaquely with a base coat of light pink-tangerine
and let it dry throughly. Do not seal. Now, mix a darker reddish
brown wash, adding a few drops of cleaner to make the paint flow.
Test a small area, the wash should puddle into the crevices. If
it looks good, apply wash quickly all over hair. If the wash drips
onto the face, its okay the clear flat lacquer will protect you.
Paint all belts on skin black, belts over pants, dark grey.
The buckles and zipper are silver. Now she's ready for her final
dating acessories.
6. Final Accessories: Metal Rings.
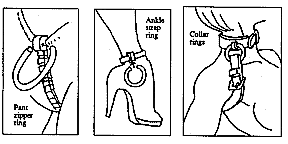
We'll start with the five metal rings. These little guys can get
away from you, so you may want to take only one out of the bag
at a time, or put them on a piece of tape. Each ring requires
clipping a small section out to fit over the resin nub. Also,
to get a really good glue contact, scrape the paint off either
side of the tiny resin nub so that bare resin is revealed. The
collar rings fit under the floatingbelt (see sketch bottom of
this column.). Let the pant zipper ring dangle naturally down
away from the pants. Same with the ankle rings.
7. Final Accessories: Cable.
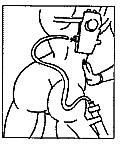
There is a short Cylinder coming out of the left side of the power
back pack. Stick one end of the power cable (black rubber cord)
in here, gluing securely. You may cut the rubber cord to any length
you think looks right, and test fit into the top of her power
baton. If you put a little twisting tension into the cord you
can get it to make a nice flowing "S" shape. Glue in
place.
8. FinalAccessories: Netting.
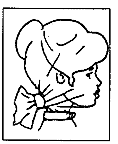
If you rub the netting between your hands you can work out some
of the starchiness. Then it'll be easier to work with Lay it over
her head with the majority of the material in the back. Grab all
the edges at the back of her neck and pinch it so that it stretches
tightly across the face. Try to keep wrinkles off her face and
keep the bottom netting above the choker strap. It may take a
couple of tries to get it right but it will get easier each time.
Once everything looks good, twist it together as tightly as possible
with one hand and put a couple drops of super glue on your Lightly
twisted knot. Hold in place as it sets (one minute). You can make
the knot even smaller by wrapping tightly with black thread. Trim
excess with scissors to make a sort of bow.
We have had a lot of illegal knock-offs of our
kits sold in foreign countries.
Remember, Azimuth Design only sells directly to
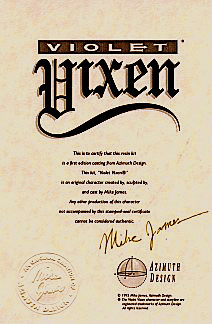
the customer, not in stores. If your kit does not include
the Certificate of Authenticity below, with the
Raised Seal and personally-inked signature
of Mike James,
you do not own a Mike James original piece of art.
It takes a lot of time, skill and money to bring you these precious
girls. Please support creators, not thieves.
Contact us if you suspect illegal activity, or if you see a Mike
James kit or image being used for profit.
Copyright © 1995 Mike James, Azimuth Design
The Violet Vixen character, likenesses thereof, storyline, costume and all related materials are copyrighted
and registered intellectual property of Azimuth Design. All rights reserved, in any media.